

The owners manual is B & W (not color) and is sometimes vague. So I decided to write a short DIY for rear light bulbs to hopefully help someone that needs to replace his/her bulbs.
- If you don’t have a “spotter” helper, next time you are at a strip mall, park the rear of the van toward the glass of the store, now check all your REAR lights (reverse, brake, running, and turn light) via your rear view mirror.
- Turn the van around facing the store's glass and check the FRONT lights (HL, turn signal).
- This DIY is for the REAR lights. If someone can add the write-up for the Front (headlight, turn signal) that would be great.
For 2007 Ody LX, I use Syvania website to check for bulb PNs:
Lamp Replacement Guide Home
Low beam headlamp
9006 …$8.00 or 9006LL Long Life Halogen Upgrade
High beam headlamp
9005
Parking light
194NA
Front turn signal
992 (7440A)
Rear turn signal
992 (7440A)
Tail light
168
7443
Stop light
7443
Fog/Driving light
H8-35W
License plate
2825
Back up light
7440
Step/Courtesy light
194
Trunk/Cargo area
DE3175
TOOL/PROCEDURE:
- All you need are: flat screwdriver, Phillips screwdriver and rubber gloves.
- Chock the wheels with bricks so the van does not move. Apply Parking Brake.
- With key in position II, place shifter in “R” to verify reverse light. Turn headlight switch ON to check running light. For brake lights, ask someone to press on the brake pedal (if you are alone, then get a stick to wedge the brake pedal against the front seat); hey a little kid can do this for you, just pay him/her 50 cents for doing this for you LOL!
- Now walk back to the rear and verify all lights are working. In my case, the L REAR brake bulb was burned.
- Now shift back to “P”, turn HL switch OFF and start working.
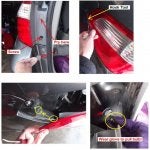
1. Pry the small covers off and undo the Phillips bolts.
2. Use a hook tool and hook as shown and pull the light assembly rearward. Note the notch where it goes for re-installation.
3. Wear rubber glove to remove the bulb as it was quite tight in the socket. You do NOT want broken glass on your fingers!
![]()
![]()
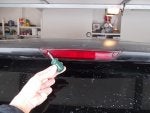
4. CENTER Brake light is straightforward, simply pry the small triangular piece out and the rest is self-explanatory.
![]()
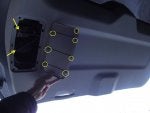
5. Tailgate bulbs are also straightforward, simply pry the cover and replace the bulb(s).
![]()
That is all boys and girls, Happy Holidays!
- If you don’t have a “spotter” helper, next time you are at a strip mall, park the rear of the van toward the glass of the store, now check all your REAR lights (reverse, brake, running, and turn light) via your rear view mirror.
- Turn the van around facing the store's glass and check the FRONT lights (HL, turn signal).
- This DIY is for the REAR lights. If someone can add the write-up for the Front (headlight, turn signal) that would be great.
For 2007 Ody LX, I use Syvania website to check for bulb PNs:
Lamp Replacement Guide Home
Low beam headlamp
9006 …$8.00 or 9006LL Long Life Halogen Upgrade
High beam headlamp
9005
Parking light
194NA
Front turn signal
992 (7440A)
Rear turn signal
992 (7440A)
Tail light
168
7443
Stop light
7443
Fog/Driving light
H8-35W
License plate
2825
Back up light
7440
Step/Courtesy light
194
Trunk/Cargo area
DE3175
TOOL/PROCEDURE:
- All you need are: flat screwdriver, Phillips screwdriver and rubber gloves.
- Chock the wheels with bricks so the van does not move. Apply Parking Brake.
- With key in position II, place shifter in “R” to verify reverse light. Turn headlight switch ON to check running light. For brake lights, ask someone to press on the brake pedal (if you are alone, then get a stick to wedge the brake pedal against the front seat); hey a little kid can do this for you, just pay him/her 50 cents for doing this for you LOL!
- Now walk back to the rear and verify all lights are working. In my case, the L REAR brake bulb was burned.
- Now shift back to “P”, turn HL switch OFF and start working.
1. Pry the small covers off and undo the Phillips bolts.
2. Use a hook tool and hook as shown and pull the light assembly rearward. Note the notch where it goes for re-installation.
3. Wear rubber glove to remove the bulb as it was quite tight in the socket. You do NOT want broken glass on your fingers!

4. CENTER Brake light is straightforward, simply pry the small triangular piece out and the rest is self-explanatory.
5. Tailgate bulbs are also straightforward, simply pry the cover and replace the bulb(s).
That is all boys and girls, Happy Holidays!


