

DIY: 2007 Honda Odyssey AC Compressor Replacement
* For those who follow the thread below (AC Clutch), I have posted in that thread that my AC Clutch went out at 37K, then every 12 months, and most recently the AC Clutch burned after 2 months (I am at 80K):
http://www.odyclub.com/forums/52-2005-2010-odyssey/93901-05-compressor-clutch-troubleshooting-7.html
* After the old compressor (with 80K) came out, I saw PAG oil behind the Stator, so my theory is oil leaked past the Front Seal, dripping down to the mounting area and also the Clutch itself, causing slipping. Once the Clutch slips, it heats up very quickly, causing the rubber to (inside the clutch plate) to burn.
* So time for me to replace the AC Compressor.
* Total Cost:
---> AC Compressor = $255 online
---> AC Recovery/Recharge = $75 + $30
---> PAG Oil = $8.00
---> Total = $368
Hey, Honda dealer quoted $1500, so I save more than $1100!
PARTS:
1. Compressor:
---> 2005-2007 Ody: Denso Compressor 471-1630 (previous version was 471-1629, stick to 471-1630!)
---> 2008-2010 Ody: Denso Compressor 471-1638 or 471-1639 ( +/- VCM)
Comparing with 471-1630, 471-1638 or 471-1639 has about 10 cc less in displacement, maybe this reduces the head pressure and maybe this is why we don't see burned Stator in 2008-2010 models?
Not sure why Honda redesigned the AC compressor half way through the 3rd Generation Ody. Perhaps during VCM operation, there is less power available, thus smaller compressor?
* Surprisingly, the Denso came with new O-rings x 3. I had bought some Honda O-rings, turned out I don’t need them! Anyway:
80871-ST7-000 is 5/8” O-ring for suction side
80872-ST7-000 is 1/2” O-ring for discharge side
2. PAG Oil:
* Use PAG-46 (NG Oil 8). The compressor came with only 50cc of oil, so I added some more, see below.
3. Splash Guard plastic clips:
* Get these as a package deal on ebay for cheap (don't buy them at Honda dealer!):
91501-S04-003, qty = 7
91503-SZ5-003, qty = 10
Ebay sellers typically sell qty = 15 or qty =20 for cheap.
4. Zip Ties in case your splash shield breaks here and there.
5. Some M6 x 1.0 x 16mm bolts, hardware store has this.
6. Optional: Desiccant bag PN 80101-SFE-003 is $40 at dealer, which is a rip-off. Use generic stuff at local autoparts store for $10. The problem with this desiccant bag: it is located on the driver side of the condenser and there is a metal frame below blocking the cap. You simply cannot replace it with the condenser in place, You have to remove the condenser from the car to replace the desiccant bag!
I did not replace my desiccant bag, I can go on with this debate but my system has always been tight with no leak (such as condenser leak or line leak).
Anyway, your choice.
GENERAL NOTES
* If you are new to HVAC, read the guide below from Honda Civic forum to get to know the terminology (compressor, evaporator etc.). Very good review, theory of operation, troubleshooting guide etc.:
Summer A/C Guide, How it Works, and When it Doesn't - Honda-Tech
* Ever wonder how the AC compressor works, here are some nice Videos:
SPEC'S
1- Bolt specs:
* 12-mm mounting bolts 16 ft-lb.
* 10-mm connections at AC Compressor: 7.2 ft-lb.
![Image]()
2- System capacity:
* R134a: 24.7- 26.5 oz
* PAG: 2007-2010: 6 oz. This is the tricky part, Helm manual is confusing the way is written, each component has certain amount of oil.
* ---> So I spoke to the Denso HQ engineers, the bottom line is: 6 oz is for factory dry fit. Oil is only needed at the compressor, anywhere else, it is a nuisance. Once the system is in operation, some oil will stay in the Rear/Front Evaporators, some in the condenser. So during Compressor change, add only 4 oz. Drain the new compressor first, then add only 4 oz to the compressor. See below!
TOOL
Besides the standard tool such as metric socket, screwdriver, you will need these special tools:
* 5.5mm or 7/32-inch socket. You can get this at Sears.
* Feeler Gauges, and AC Clutch Tool (to hold the Clutch still while you remove the 10-mm bolt). I used this to re-adjusted the factory gap from 0.559 mm to 0.300 mm.
* Loctite for 10-mm bolt (I used this as added caution).
* Serpentine Belt Tool
* Eye goggles
* AC Recharge Gauge in case you vacuum/recharge yourself.
* Measuring Cup, don’t use your kitchen stuff, get a new measuring cup for $2.00.
* Empty box for nuts/bolts.
* Ziploc bags and rubber bands to plug the open lines. This is crucial!
![]()
![]()
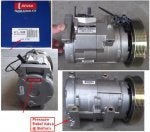
* Note the Relief Valve at the bottom of the compressor, this valve opens when system pressure is above 450 psi (IIRC), this happens when your relay is stuck ON all the time:
![]()
![]()
PROCEDURE
* Go to car wash the day before and wash the under chassis beforehand to keep things clean.
* You can buy the vacuum pump for $90, but I don’t do HVAC for a living. For the same money, I got good service from local shop:
* I used “Brake Plus” shop. They say “recovery” vacuum is different from “vacuum” (prior to charging with R134a). Anyway, price by Brake Plus:
* $75 for R134a recovery (they recovered 2.0 lbs out R134a from my system)
* Went home and replaced AC Compressor
* Came back to have system vacuum (30-45 min of vacuum), then R134a added. Cost = $30 for this.
1. Front van up on wood ramps, put in Park. Now turn wheels turned all the way to the Right.
2. Remove Belt. I have J35A6 engine (mechanical tensioner). If you have J35A7 engine, see the Timing Belt thread for info on Hydraulic Tensioner. Anyway, place the tool as shown, leave some room for it to rebound because once the belt is out, the tool will move to the front, hitting the hoses.
* The UPPER Pulley is where you place the 14-mm socket/belt tool.
INSTALL NOTE: Make a diagram of the belt routing for re-installation. Tip: loop the belt around all pulleys, and do the tensioner pulley last. Make sure that the belt fits in ALL grooves when refitting it. Failure to do so may cause the belt to slip and tangle inside the TB compartment, ruining your engine (see forum for that thread).
![]()
3. Remove splash guard. I spent close to 45 min. fighting with all these stupid plastic clips. In my BMW, the splash guard comes out in 5 min (Phillips screws). These Honda clips are simply dumb design!
Note that Honda uses 2 different types of clips (small and large) for this area.
![]()
4. Now the Right Fender area is another dumb design. The 10-mm bolt seized, during removal, the nut tab (part of the liner) broke off from the plastic liner! So the bolt is bonded to the broken metal tab. I spent 1h fighting with this bolt. Then I gave up and yanked it to the top. Then during install Zip Ties solved the problems LOL!
- Fold the Plastic Liner to create space to deliver the baby!
![]()
5. Disconnect both suction and discharge lines (10-mm bolt and 10-mm nut). Immediately cap them with Ziploc bags and rubber bands to keep moisture out.
NOTE: Use new O-rings supplied with compressor.
6. The compressor is mounted by four (4) 12-mm bolts. Wear gloves, and go slow, make sure the socket bite onto the top bolts properly. Do NOT strip the bolt head.
* Compressor is removed via the wheel well area.
* NOTE: disconnect the wiring near the radiator fan. Look at the wiring of the new part, you will see the tab, squeeze the tab, then use a small flat screwdriver the pry the 2 connectors apart. Note that during install, the connector must be fitted to the metal tab on the radiator fan shroud to keep them out of the fan blades! Anyway, observe your factory setup before taking them apart. Sorry no photo for this part but someone can post it later.
![]()
![]()
* For those who follow the thread below (AC Clutch), I have posted in that thread that my AC Clutch went out at 37K, then every 12 months, and most recently the AC Clutch burned after 2 months (I am at 80K):
http://www.odyclub.com/forums/52-2005-2010-odyssey/93901-05-compressor-clutch-troubleshooting-7.html
* After the old compressor (with 80K) came out, I saw PAG oil behind the Stator, so my theory is oil leaked past the Front Seal, dripping down to the mounting area and also the Clutch itself, causing slipping. Once the Clutch slips, it heats up very quickly, causing the rubber to (inside the clutch plate) to burn.
* So time for me to replace the AC Compressor.
* Total Cost:
---> AC Compressor = $255 online
---> AC Recovery/Recharge = $75 + $30
---> PAG Oil = $8.00
---> Total = $368
Hey, Honda dealer quoted $1500, so I save more than $1100!
PARTS:
1. Compressor:
---> 2005-2007 Ody: Denso Compressor 471-1630 (previous version was 471-1629, stick to 471-1630!)
---> 2008-2010 Ody: Denso Compressor 471-1638 or 471-1639 ( +/- VCM)
Comparing with 471-1630, 471-1638 or 471-1639 has about 10 cc less in displacement, maybe this reduces the head pressure and maybe this is why we don't see burned Stator in 2008-2010 models?
Not sure why Honda redesigned the AC compressor half way through the 3rd Generation Ody. Perhaps during VCM operation, there is less power available, thus smaller compressor?
* Surprisingly, the Denso came with new O-rings x 3. I had bought some Honda O-rings, turned out I don’t need them! Anyway:
80871-ST7-000 is 5/8” O-ring for suction side
80872-ST7-000 is 1/2” O-ring for discharge side
2. PAG Oil:
* Use PAG-46 (NG Oil 8). The compressor came with only 50cc of oil, so I added some more, see below.
3. Splash Guard plastic clips:
* Get these as a package deal on ebay for cheap (don't buy them at Honda dealer!):
91501-S04-003, qty = 7
91503-SZ5-003, qty = 10
Ebay sellers typically sell qty = 15 or qty =20 for cheap.
4. Zip Ties in case your splash shield breaks here and there.
5. Some M6 x 1.0 x 16mm bolts, hardware store has this.
6. Optional: Desiccant bag PN 80101-SFE-003 is $40 at dealer, which is a rip-off. Use generic stuff at local autoparts store for $10. The problem with this desiccant bag: it is located on the driver side of the condenser and there is a metal frame below blocking the cap. You simply cannot replace it with the condenser in place, You have to remove the condenser from the car to replace the desiccant bag!
I did not replace my desiccant bag, I can go on with this debate but my system has always been tight with no leak (such as condenser leak or line leak).
Anyway, your choice.
GENERAL NOTES
* If you are new to HVAC, read the guide below from Honda Civic forum to get to know the terminology (compressor, evaporator etc.). Very good review, theory of operation, troubleshooting guide etc.:
Summer A/C Guide, How it Works, and When it Doesn't - Honda-Tech
* Ever wonder how the AC compressor works, here are some nice Videos:
SPEC'S
1- Bolt specs:
* 12-mm mounting bolts 16 ft-lb.
* 10-mm connections at AC Compressor: 7.2 ft-lb.

2- System capacity:
* R134a: 24.7- 26.5 oz
* PAG: 2007-2010: 6 oz. This is the tricky part, Helm manual is confusing the way is written, each component has certain amount of oil.
* ---> So I spoke to the Denso HQ engineers, the bottom line is: 6 oz is for factory dry fit. Oil is only needed at the compressor, anywhere else, it is a nuisance. Once the system is in operation, some oil will stay in the Rear/Front Evaporators, some in the condenser. So during Compressor change, add only 4 oz. Drain the new compressor first, then add only 4 oz to the compressor. See below!
TOOL
Besides the standard tool such as metric socket, screwdriver, you will need these special tools:
* 5.5mm or 7/32-inch socket. You can get this at Sears.
* Feeler Gauges, and AC Clutch Tool (to hold the Clutch still while you remove the 10-mm bolt). I used this to re-adjusted the factory gap from 0.559 mm to 0.300 mm.
* Loctite for 10-mm bolt (I used this as added caution).
* Serpentine Belt Tool
* Eye goggles
* AC Recharge Gauge in case you vacuum/recharge yourself.
* Measuring Cup, don’t use your kitchen stuff, get a new measuring cup for $2.00.
* Empty box for nuts/bolts.
* Ziploc bags and rubber bands to plug the open lines. This is crucial!


* Note the Relief Valve at the bottom of the compressor, this valve opens when system pressure is above 450 psi (IIRC), this happens when your relay is stuck ON all the time:

PROCEDURE
* Go to car wash the day before and wash the under chassis beforehand to keep things clean.
* You can buy the vacuum pump for $90, but I don’t do HVAC for a living. For the same money, I got good service from local shop:
* I used “Brake Plus” shop. They say “recovery” vacuum is different from “vacuum” (prior to charging with R134a). Anyway, price by Brake Plus:
* $75 for R134a recovery (they recovered 2.0 lbs out R134a from my system)
* Went home and replaced AC Compressor
* Came back to have system vacuum (30-45 min of vacuum), then R134a added. Cost = $30 for this.
1. Front van up on wood ramps, put in Park. Now turn wheels turned all the way to the Right.
2. Remove Belt. I have J35A6 engine (mechanical tensioner). If you have J35A7 engine, see the Timing Belt thread for info on Hydraulic Tensioner. Anyway, place the tool as shown, leave some room for it to rebound because once the belt is out, the tool will move to the front, hitting the hoses.
* The UPPER Pulley is where you place the 14-mm socket/belt tool.
INSTALL NOTE: Make a diagram of the belt routing for re-installation. Tip: loop the belt around all pulleys, and do the tensioner pulley last. Make sure that the belt fits in ALL grooves when refitting it. Failure to do so may cause the belt to slip and tangle inside the TB compartment, ruining your engine (see forum for that thread).

3. Remove splash guard. I spent close to 45 min. fighting with all these stupid plastic clips. In my BMW, the splash guard comes out in 5 min (Phillips screws). These Honda clips are simply dumb design!
Note that Honda uses 2 different types of clips (small and large) for this area.

4. Now the Right Fender area is another dumb design. The 10-mm bolt seized, during removal, the nut tab (part of the liner) broke off from the plastic liner! So the bolt is bonded to the broken metal tab. I spent 1h fighting with this bolt. Then I gave up and yanked it to the top. Then during install Zip Ties solved the problems LOL!
- Fold the Plastic Liner to create space to deliver the baby!

5. Disconnect both suction and discharge lines (10-mm bolt and 10-mm nut). Immediately cap them with Ziploc bags and rubber bands to keep moisture out.
NOTE: Use new O-rings supplied with compressor.
6. The compressor is mounted by four (4) 12-mm bolts. Wear gloves, and go slow, make sure the socket bite onto the top bolts properly. Do NOT strip the bolt head.
* Compressor is removed via the wheel well area.
* NOTE: disconnect the wiring near the radiator fan. Look at the wiring of the new part, you will see the tab, squeeze the tab, then use a small flat screwdriver the pry the 2 connectors apart. Note that during install, the connector must be fitted to the metal tab on the radiator fan shroud to keep them out of the fan blades! Anyway, observe your factory setup before taking them apart. Sorry no photo for this part but someone can post it later.


")


