Honda Odyssey Forum banner
1 - 20 of 21 Posts

CaptainSerious

· Registered
2007 Odyssey EX-L NAV/RES
Joined
·
26 Posts
Discussion starter · #1 ·
The stock backup camera on my 2007 Odyssey is just terrible. It’s not clear, it might as well be black and white, and it’s hard to see during the day. The sentiments on this forum seem to reflect that my camera’s performance is normal for the generation.

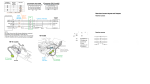
To keep this first post short: I successfully replaced the stock camera with an aftermarket one. It was a serious pain, but completely worth it. I’m writing this thread to share my experience and make this modification less painful for people.

If anyone is on the fence about replacing the stock camera with an aftermarket, my suggestion is to do it. It is a huge difference and I’m glad that I did it.

That said, here are the before and after photos. You can see there is a major improvement. The screen brightness was set to the center value for both the before and after photos.

Image
 
Discussion starter · #2 ·
Here are some comments that I disagree with that I found online regarding our terrible 3rd Gen Odyssey backup cameras:

  1. The camera lens gets frosty and that is the cause of the poor camera image.
    Definitely not. My lens was clear and I even cleaned it thinking that it could be the problem as many people and one youtuber suggested. My recommendation is to take a look at your lens, keep it clean, but don’t expect a miracle here.
  1. The dash screen is not capable of displaying a good image.
    Although ‘good’ is subjective, I can say confidently that the stock dash screen is capable of displaying a much better image than it does with the stock camera. The stock camera is definitely the weak link. I’m not saying the stock screen is HD or anything, but it is more than usable with an aftermarket camera. For example, switch over to the map or some other menu on the stock screen, expect that quality of imagery from the aftermarket backup camera.

Here's my opinion:
Stock screen with stock camera = not usable
Stock screen with aftermarket camera = great in comparison and you won’t get seriously pissed off every time you’re backing up.
 
Discussion starter · #3 · (Edited)
Here is another comparison photo. The before and after were taken in the same locations, about the same time of day, just a few days apart. The screen brightness setting was in the middle of the range for all photos. I didn’t realize it at the time the photos were taken but one focused on the background and the other on the dash. Oh well.

The morning sun is directly behind the van in these photos.

Image
 
Discussion starter · #4 ·
Before you start, here are some things to consider:

This is not plug and play, there’s some technical skill required.

I’m sure the actual installation process can be done in 1 day if you keep at it. The research and testing and such took a lot of time. I spread this out over many days.

You have to remove the rear interior trim from the hatch. You have to remove the rear plastic body panel (the piece around the license plate) from the rear of the hatch.

You should probably get a plastic body trim removal tool to remove the trim and body panels off of the rear hatch.

You will have to cut the stock camera wiring harness and splice in the aftermarket camera wiring harness. Wiring is straight forward if you know how to use a soldering iron and shrinkwrap. I looked into buying the stock wiring harness connector so I didn’t have to cut my stock harness, but I could not find one.

Any aftermarket camera with composite output will work. The Odyssey expects composite video for the backup camera.

Do not use the aftermarket backup cameras that mount to a license plate frame and have the camera in the center between the top two license plate mounting bolts. This sounds like an easy idea but I tried one and the camera will block access to the hatch handle/latch.

I used the same camera as Jon Lazar. He’s the only other person I found that did this modification. The camera he used is small and I like the mounting method. Search Amazon for ‘NATIKA backup camera’.

You will have to make a bracket to hold the aftermarket camera. I’ll show you mine but it’s going to depend on what camera you get and where you mount it. I’ll have a post below dedicated to mounting the camera.

The Service Manual pages 23-224, 23-225, 23-274, 23-297 were very helpful.

There was one thread on OdyClub that was fairly helpful, at least pointing me in a pretty good direction, however, there was one part of the wiring up the aftermarket camera that I didn’t agree with. I’ll discuss this later. No disrespect to anyone who attempted to document their project, I’m just going to point it out and everyone can decide how they want to proceed. The thread is here, it is certainly worth reading: 2007 odyssey backup camera upgrade?
 
Discussion starter · #5 ·
Regarding my one disagreement with Post #35 of 2007 odyssey backup camera upgrade?

To me, it appears that the connections shown in Post #35 will send +12v to ground when the vehicle is put into reverse.

The red and pink wires (actually both red but one looks pink in the photo) on the aftermarket harness are connected together. I have the same camera and same harness and have verified these have continuity. The reason they are connected is that when +12v is sent to the camera when the car is in reverse, the harness sends a +12v signal on that pink wire back to the head unit (along with the composite video) so the head unit knows the car is in reverse.

The white wire of the stock harness is Video Ground. The Pink Wire will send +12v to the Ground of the white wire… creating a direct short circuit.

I’m basing these comments on my research for and observations of my 2007. I will agree there is a possibility that the harness and Odyssey in Post #35 is different than mine. Just check this for yourself when replacing your camera.

Image
 
Discussion starter · #6 ·
VAN WIRING

In the 2007-2010 Service Manual, pages 23-224 and 23-225 show the car harness wiring. However, it is slightly confusing because the wire colors shown only apply to the car harness. The camera’s harness has different colors and is not shown in the Service Manual.

Therefore, I have created a modified sketch that shows the colors of the car harness and camera harness.

The sketch is using the 2007 diagram because I have a 2007. The 2008-2010 models swap the yellow and green colors on the car harness.

Also, the 2007 camera and license plate lights use the same harness. In the 2008-2010 models, I believe the camera has its own harness.

Image
 

Attachments

Discussion starter · #7 ·
HARNESS

I have a 2007, I cut the harness as shown in the photo. You can take that cut-off piece inside your house for easy soldering.

There’s not much to say here. Connect the Aftermarket Harness and the Cut Stock Harness as shown in the graphic.

Image


Shrink-wrap each individual connection, then put a large shrink wrap over the entire harness. The harness can be made to look quite tidy if you take your time.


Image
 
Discussion starter · #8 ·
CAMERA PLACEMENT AND MOUNTING

The stock camera is not centered on the van. I did notice that if you lined up the parking spot lines with the Nav Screen, the Odyssey would not be in the center of the parking spot. I wanted to move the aftermarket camera closer to the center of the vehicle (photo in next post).

The camera can not be put exactly in the center because the hatch handle is there. Like I said before, trying to use one of those License Plate Bracket Cameras will not work because the camera will block the Hatch latch handle.

I decided to mount mine between the hatch handle and the license plate light. Doing so was a tight squeeze. I drilled a hole in the plastic body panel. Turned out that the mounting shaft of the camera was too long, so I had to make a 5mm spacer. My spacer is 3D Printed and made from ABS so it wouldn’t get soft in the sun.

I made a gasket out of that 2mm foam sheet from the craft store. I had brown on hand so I just colored it with a sharpie to make it black. The surface area where I mounted the camera wasn’t completely flat so the foam helped a bit in that regard too.

I am happy with the camera placement. I don’t accidently hit the camera when opening the hatch.

I left the alignment indicator option on, they seem to be pretty good left-to-right wise. Much better than the offset stock camera. The aftermarket camera has a setting where you can turn the alignment indicator lines off.

I also left the stock camera there in all its disconnected glory. If I removed it, there would just be a big hole there. The stock camera is unobtrusive so I’m not too worried.

I just ran the little harness I wired up along the stock harness and through the stock grommet.

Image


Image
 
Discussion starter · #9 ·
SIDE MOUNT VS CENTER-ISH MOUNT

The stock camera is far off to the side and doesn’t help you back into a parking spot because the image is angled. I installed the aftermarket camera closer to the center of the van. In the below photos, pay attention to angle of the parking spot lines of the spot behind me. For both of these photos, the van was in the center of the parking spot, I got out and made sure I was right in the middle. The photos were taken at the same time of day, a few days apart.

Image
 
Discussion starter · #11 ·
For reference to anyone curious: Here are some photos of the stock camera inside the removable rear plastic body panel. I spent a lot of time looking for photos of the inside of this panel. I did find one crappy youtube video that showed this area a little bit, but I had to be precise with the pause button and doing so wasn't really what I was looking for.

In this top photo, you can see the camera bracket, the camera/license-plate-light harness and the grommet that goes into the van hatch.

Image


Image


Image


Image
 
Nice work. I figured something like this would be possible.
 
Wow heck of a job, we really appreciate you taking the time and sharing step by step how to upgrade the camera. Seems like a huge improvement.
 
Discussion starter · #14 ·
Wow heck of a job, we really appreciate you taking the time and sharing step by step how to upgrade the camera. Seems like a huge improvement.
Thanks Kaimanson. I figured I'd document my experience as I was not able to find any straight forward instructions for doing the camera swap. If I can help just one Odyssey back up better, it'll all be worth it :ROFLMAO: Doing the actual work wasn't difficult, but all the time was taken up by the research and trying to be confident that I wasn't going to mess something up beyond repair.
 
Captain, thanks and a great job! Funny, I was recently driving a newer vehicle and the backup camera was clear and sharp, and I thought that it would almost be worthwhile to buy a newer vehicle just to get the better camera!

That being said, there is no excuse for the crappy camera in our vehicles. Just no excuse, even if it is 2000 technology, as video systems have been around for many decades.
 
Holy smokes, great post!

I'm upgrading the stock radio on an EX, and as part of the project, want to add a backup camera. This thread will be my Bible.
I imagine half the battle will be easier in your case since you won't have to deal with matching an aftermarket camera harness to the factory harness.
 
I imagine half the battle will be easier in your case since you won't have to deal with matching an aftermarket camera harness to the factory harness.
Agreed. Between the exact model of camera used above, plus the additional wiring data that I won't have to dig through my manual for, this road map is gonna be pretty easy to follow.
 
1 - 20 of 21 Posts