

There are simply too many threads on the issue of sliding door rattles, its probable causes and tons of frustration even with dealer service.
I hope this DIY would put to rest this Sliding Door creaking/squeaking issues.
Two possible causes:
1. Something loose inside the Sliding Door. This will be addressed first.
2. The Sliding Door slides back and forth during acceleration/deceleration/cruising through bumpy road, allowing the Sliding Door to rub with the seal on the Body Frame (especially the TOP Seal) causing squeaking noises!
Anyway, let's get to work. This is in fact very simple:
---------
PARTS:
- Honda Trim Retainer PN 91560-S84-A01: $7 for a pack of 15 on ebay.
- Trim Removal Tool: $6-$7 at autoparts store
- “Butyl Rope”, this stuff is used to seal windshield glass for older cars. About $10/10-foot roll at local Auto Glass Shop.
- Fuel Hoses with O.D. = 12mm or more. This is because when the door is closed, it squeezes to hose down to about 6-7mm or so. Best is to get a variety of different sizes of fuel hoses. They are cheap at local autoparts store.
![]()
DOOR PANEL REMOVAL:
- I did this to grease any potential rattling points. I left the 2nd row seat in place, you can remove it for easier access (you don't have to, just an option).
1- The Handle is held by a circlip, use a flat screwdriver to push it downward. Do NOT lose the circlip.
Note how it fits for install.
![]()
2- Use Trim Removal Tool (wrapped with cloth) and pry the UPPER Trim piece as shown:
![]()
3- Now use Trim Removal Tool (wrapped with cloth) to pry at the bottom of the Panel. There are 11 retainers, some may break (I broke 2) during removal. NOTE the window switch connection: disconnect it.
- Once all 11 retainers are disconnected, lift the Panel UPWARD to remove it.
- Set the Panel in a safe place.
![]()
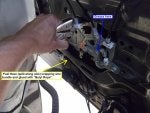
4- Gently lift the Vapor Barrier (itself is glued to the door by Butyl Rope).
- Areas in BLUE are where I applied the grease. Touch around and see if any areas can potentially rattle: grease it.
- A wire bundle at the bottom of the door slaps against the door, so I slit a fuel hose along its axis and used it to wrap the wire bundle, then used Butyl Rope to “glue” it to the door.
- Re-install Vapor Barrier, you may need to add some Butyl Rope for a good seal.
- Re-install the Panel: engage the Top of Panel first, do NOT forget the window switch connection! Then use your fist to snap it in place (make sure the retainers line up with the holes first!).
![]()
![]()
HOW TO SHIM SLIDING DOOR:
5- Now we need to move to the door creaking/squeaking issues.
There are literally hundreds of posts in the forum about this.
You can try the TSB 06-003 but I did not find it useful for me. Here it is in case you need it:
http://www.urvi.net/forumfiles/SB/A06-003.PDF
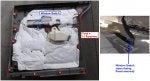
6- I have a whole bunch of furniture protection pads at home, for the most parts they are not that useful:
![]()
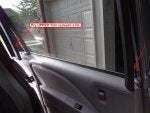
7- To diagnose door creaking/squeaking issues, use a rag, fold it maybe 4 times its thickness, then close the sliding door (watch your fingers!).
- Now go for a test ride on bumpy road, voila, dead quiet. So one of the major culprits: the sliding door is allowed to move back and forth 1mm or so. But this is enough to for the sliding door to rub against the seal on the body frame (especially the TOP seal) causing creaking/squeaking issues.
![]()
8- Now back to the drawing board: how to apply a cushion material thick enough for a perfect fit!
- Too thin: same issues of creaking.
- Too thick: you won’t be able to close the sliding door.
I have a whole bunch of fuel hoses at home so I gave it a try.
- I used a small piece of Butyl Rope as “glue”.
- I tried a fuel hose with I.D. = 3/6” (forgot to measure the O.D.): no go, still creaking noises during test drive!
- Next up: Fuel Hose with O.D. = 13mm: perfect! Voila, the test drive is dead quiet. Wife is happy!
![]()
I hope this DIY would put to rest this Sliding Door creaking/squeaking issues.
Two possible causes:
1. Something loose inside the Sliding Door. This will be addressed first.
2. The Sliding Door slides back and forth during acceleration/deceleration/cruising through bumpy road, allowing the Sliding Door to rub with the seal on the Body Frame (especially the TOP Seal) causing squeaking noises!
Anyway, let's get to work. This is in fact very simple:
---------
PARTS:
- Honda Trim Retainer PN 91560-S84-A01: $7 for a pack of 15 on ebay.
- Trim Removal Tool: $6-$7 at autoparts store
- “Butyl Rope”, this stuff is used to seal windshield glass for older cars. About $10/10-foot roll at local Auto Glass Shop.
- Fuel Hoses with O.D. = 12mm or more. This is because when the door is closed, it squeezes to hose down to about 6-7mm or so. Best is to get a variety of different sizes of fuel hoses. They are cheap at local autoparts store.

DOOR PANEL REMOVAL:
- I did this to grease any potential rattling points. I left the 2nd row seat in place, you can remove it for easier access (you don't have to, just an option).
1- The Handle is held by a circlip, use a flat screwdriver to push it downward. Do NOT lose the circlip.
Note how it fits for install.

2- Use Trim Removal Tool (wrapped with cloth) and pry the UPPER Trim piece as shown:
3- Now use Trim Removal Tool (wrapped with cloth) to pry at the bottom of the Panel. There are 11 retainers, some may break (I broke 2) during removal. NOTE the window switch connection: disconnect it.
- Once all 11 retainers are disconnected, lift the Panel UPWARD to remove it.
- Set the Panel in a safe place.
4- Gently lift the Vapor Barrier (itself is glued to the door by Butyl Rope).
- Areas in BLUE are where I applied the grease. Touch around and see if any areas can potentially rattle: grease it.
- A wire bundle at the bottom of the door slaps against the door, so I slit a fuel hose along its axis and used it to wrap the wire bundle, then used Butyl Rope to “glue” it to the door.
- Re-install Vapor Barrier, you may need to add some Butyl Rope for a good seal.
- Re-install the Panel: engage the Top of Panel first, do NOT forget the window switch connection! Then use your fist to snap it in place (make sure the retainers line up with the holes first!).

HOW TO SHIM SLIDING DOOR:
5- Now we need to move to the door creaking/squeaking issues.
There are literally hundreds of posts in the forum about this.
You can try the TSB 06-003 but I did not find it useful for me. Here it is in case you need it:
http://www.urvi.net/forumfiles/SB/A06-003.PDF
6- I have a whole bunch of furniture protection pads at home, for the most parts they are not that useful:

7- To diagnose door creaking/squeaking issues, use a rag, fold it maybe 4 times its thickness, then close the sliding door (watch your fingers!).
- Now go for a test ride on bumpy road, voila, dead quiet. So one of the major culprits: the sliding door is allowed to move back and forth 1mm or so. But this is enough to for the sliding door to rub against the seal on the body frame (especially the TOP seal) causing creaking/squeaking issues.

8- Now back to the drawing board: how to apply a cushion material thick enough for a perfect fit!
- Too thin: same issues of creaking.
- Too thick: you won’t be able to close the sliding door.
I have a whole bunch of fuel hoses at home so I gave it a try.
- I used a small piece of Butyl Rope as “glue”.
- I tried a fuel hose with I.D. = 3/6” (forgot to measure the O.D.): no go, still creaking noises during test drive!
- Next up: Fuel Hose with O.D. = 13mm: perfect! Voila, the test drive is dead quiet. Wife is happy!


")


