2000 Ody, 208,000 miles, transmission replaced twice, and not needs replaced again. We were able to get it covered in the first two replacements. This one is beyond the coverage period and its hard to pay for the replacement when the car value is probably less than the cost of the trans. So, I decided to remove it myself. I have done this at a much younger age, which was about 25 yrs ago. In looking through other post, internet, and a book on the procedures, I found there was more inforamtion needed. So I wrote up the procedure for the 2000. I also looked into ways to reduce the amount of bolts removed. With this age, the bolts can be really seized up and break. The one thing I wanted to try to avoid was removing the exhaust pipe from the manifold. The result was, the subframe was removed, but stayed under the car and hung over the exhaust. Was not sure I could get clearance so the trans. would be low enough to come out on the driver side, but the frame would be low enough that the trans. could go over it. It turned out the trans. was about 1" below the body frame and 1" above the subframe. The subframe does not go any lower when the exhaust pipe is attached. The exhaust would normally be removed to make this easyer, but it could also be left on and the subframe lays on the pipe allowing just enough room to remove the trans.
2000 Honda Odyssey Transmission Removal
Tools you need: Minimum,
36mm socket (if you plan to pull the axle nut)
10, 12, 14, 17, 19mm sockets
Air Impact wrench
air ratchet (recommended)
Breaker bar
Ball joint tool (long fork looking tool)
Rubber Mallet
3/8 and ½ drive sockets, racket and extensions
Oil tray for collecting trans oil
Girder/joist to build a support over the engine.
Tools to fix any broken, spun, or rounded off nuts/bolts. I used a cut off wheel on one, the other I drilled out with a series of bits so I could snap off the nut. One other one just broke off.
Chain/straps to secure engine transmission. Four of the five mounts need disconnected and the engine/transmissions needs good support. Can’t be too safe here. Used good supports and safety backups.
Here's how I did it:
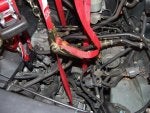
1. Unhook the battery, remove battery and battery tray.
2. Remove the intake (disconnect suction lines and wires mostly to the intake, but some to the aluminum intake manifold that are just in the way.
3. Remove the starter (I left the started connected and just tied it to the radiator)
4. Pull off all of the other sensors attached to the tranny (I think mine had 10, on the back there is one that has 3 connections only one of the three are used) (from above and below). Disconnect a wiring harness block attached to the top of the transmission.
5. Remove the tranny ground cable
6. Drain the transmission oil and reinstall plug (below)
7. Disconnect tranny cooling lines connecting to the radiator. Plug the rubber lines and tie them up.
8. Throttle cable to carburetor does not need to be detached, pull out cable from clamps so it has plenty of room to stretch out.
9. (below) Remove the shifter cable cover and shifter cable.
10. Remove the axles (a few ways to do this) You don't actually have to remove it from the hub to get the transmission out. You remove the driver side ball joint and pull the axle out from the transmission. In my case, I actually left the passenger side ball joint on and had the intermediation shaft (connecting to the axle shaft) was left on. It was pulled out when the transmission was pulled. (Not sure this will be easy on the install, if not, then detach bearing support for the intermediate shaft). The ball joint is removed either with a joint tool, or I used some wedges and pried it off the lower arm after some hammering on the wedges and the back of the tapered hole in the arm.
Axle removal: Crack the axle nut loose. The best way for this is a 36mm impact socket and air impact wrench. You need to use an impact socket for this to work, not a regular socket. You can rent the sockets at some auto stores. Impact wrenches are hard to find, but I was able to rent one locally for $15/day. Ingersol Rand does about 400 ft lbs torque, which is needed for these. When you to remove the ball joint and pull the axle out, you need to use a screw driver and pry the spline out of the transmission. Don’t just pull it out without prying it first about an inch with a screw driver between the shaft end and the transmission.
11. Remove the torsion bar link rod. You can remove the small socket joint at the top of the link.
12. Detach the front of the wheel well plastic liners and pull them back to the back side of the hubs. Remove the plastic splash shield from the bottom across the front covering the radiator area.
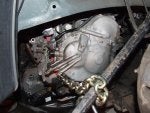
13. Remove the 4 bolts connecting the rack and pinion to the sub frame. Some of the nuts are welded to the rack frame and will break loose. The two bolts ends (17 mm) from below on the gear housing will turn and will require connecting a 14 mm from above behind the engine with a 24” extension and swivel. Good luck with these. The other two are 14 mm from above only on the passenger side. Tie up the gear box so it does not drop down when the subframe is lowered. I tied it up at both ends.
14. Loosen the subframe bolts. I used the air impact on these just to loosen them, but leave them in for now. There is a backing plate that can be moved to the side and the main frame bolt put back in. I used a jack to support the frame when I removed the bolt for swinging the backing plate out of the way. I hand tightened them back with a ratchet until I was ready to drop the frame.
15. Disconnect the exhaust attached to subframe. I left the exhaust attached to the engine manifold. It is a little crowed, but the subframe will lay on the exhaust pipe when it is dropped to remove the transmission. The exhaust drops down with when the engine/transmission is lowered on the driver side to pull out the transmission. I tried to loosen the exhaust nuts and was concerned I would break them off. I don’t have a torch anymore so I was not wanting to deal with broken bolts here, if I could get away with leaving it attached. It worked out leaving it attached.
16.Place a tranny jack under the tranny ( I used a regular jack with a piece of 2x4 on it to support the weight better). I also installed a support beam over the engine. It was made of 4x4’s on the sides and 3 - 2x6 bolted together over the engine. I attached strapping to both the engine and transmission from the beam.
17. Remove 4 transmission mounts attached to sub frame. One nut rounded off on mine. Raise the engine slightly to take the weight off the mounts. Remove the mounts. The front engine mount near the radiator, take off the top nut only. The rear engine mount next to the fire wall, unbolt from the mount from the subframe. The two mounts on the transmission, take the nuts off the subframe. The engine mount on the passenger side, near the serpentine belt, stays on. The engine swivels off this. It will cause the pulleys to lay against the side frame when the transmission end is dropped for removal. I raise it back up a little after the transmission was removed to relieve any stress on the pulleys. May also loosen the side mount bolts to get a little extra play in lowering the engine.
18. Loosen the transmission bolts (should be 8). I loosened these as I came across them while disconnection other stuff. I miss counted one, the one that is next to the intermediate shaft. You need a total of 36” of extension rod to get this from the passenger side. I cracked my 3/8” 17mm socket on this. I left this one at the side, intermediate shaft, in place and slowly loosened it as I pulled some on the transmission. The bell housing separated about ¼ inch, so I new I was good on getting detached. Completely removed the bolt and was ready for removal.
19. I placed a piece of ¾ inch plywood at the subframe the slide the transmission to the ground. I left my vehicle close to the ground so I could have good access from above. If I needed, I could raise it to remove the trans. It worked out that I did not raise it, but needed some wiggling. My drive side jack stand was only 13” off the ground. Got a little tight getting in and out. I put carpet down, spent a lot of time down there and not too bad when you want to a break.
Notes. After you spend a lot of time looking at the tranny from above and below, you will start to recheck for connections to the transmission. You should also print some photos of a transmission to start to see what comes out with the transmission.
I made marks on the subframe and the car body to try and align the frame back correctly when it is installed.
In the 4th attachment, you can see the subframe below the trans, and the subframe laying on the exhaust.
2000 Honda Odyssey Transmission Removal
Tools you need: Minimum,
36mm socket (if you plan to pull the axle nut)
10, 12, 14, 17, 19mm sockets
Air Impact wrench
air ratchet (recommended)
Breaker bar
Ball joint tool (long fork looking tool)
Rubber Mallet
3/8 and ½ drive sockets, racket and extensions
Oil tray for collecting trans oil
Girder/joist to build a support over the engine.
Tools to fix any broken, spun, or rounded off nuts/bolts. I used a cut off wheel on one, the other I drilled out with a series of bits so I could snap off the nut. One other one just broke off.
Chain/straps to secure engine transmission. Four of the five mounts need disconnected and the engine/transmissions needs good support. Can’t be too safe here. Used good supports and safety backups.
Here's how I did it:
1. Unhook the battery, remove battery and battery tray.
2. Remove the intake (disconnect suction lines and wires mostly to the intake, but some to the aluminum intake manifold that are just in the way.
3. Remove the starter (I left the started connected and just tied it to the radiator)
4. Pull off all of the other sensors attached to the tranny (I think mine had 10, on the back there is one that has 3 connections only one of the three are used) (from above and below). Disconnect a wiring harness block attached to the top of the transmission.
5. Remove the tranny ground cable
6. Drain the transmission oil and reinstall plug (below)
7. Disconnect tranny cooling lines connecting to the radiator. Plug the rubber lines and tie them up.
8. Throttle cable to carburetor does not need to be detached, pull out cable from clamps so it has plenty of room to stretch out.
9. (below) Remove the shifter cable cover and shifter cable.
10. Remove the axles (a few ways to do this) You don't actually have to remove it from the hub to get the transmission out. You remove the driver side ball joint and pull the axle out from the transmission. In my case, I actually left the passenger side ball joint on and had the intermediation shaft (connecting to the axle shaft) was left on. It was pulled out when the transmission was pulled. (Not sure this will be easy on the install, if not, then detach bearing support for the intermediate shaft). The ball joint is removed either with a joint tool, or I used some wedges and pried it off the lower arm after some hammering on the wedges and the back of the tapered hole in the arm.
Axle removal: Crack the axle nut loose. The best way for this is a 36mm impact socket and air impact wrench. You need to use an impact socket for this to work, not a regular socket. You can rent the sockets at some auto stores. Impact wrenches are hard to find, but I was able to rent one locally for $15/day. Ingersol Rand does about 400 ft lbs torque, which is needed for these. When you to remove the ball joint and pull the axle out, you need to use a screw driver and pry the spline out of the transmission. Don’t just pull it out without prying it first about an inch with a screw driver between the shaft end and the transmission.
11. Remove the torsion bar link rod. You can remove the small socket joint at the top of the link.
12. Detach the front of the wheel well plastic liners and pull them back to the back side of the hubs. Remove the plastic splash shield from the bottom across the front covering the radiator area.
13. Remove the 4 bolts connecting the rack and pinion to the sub frame. Some of the nuts are welded to the rack frame and will break loose. The two bolts ends (17 mm) from below on the gear housing will turn and will require connecting a 14 mm from above behind the engine with a 24” extension and swivel. Good luck with these. The other two are 14 mm from above only on the passenger side. Tie up the gear box so it does not drop down when the subframe is lowered. I tied it up at both ends.
14. Loosen the subframe bolts. I used the air impact on these just to loosen them, but leave them in for now. There is a backing plate that can be moved to the side and the main frame bolt put back in. I used a jack to support the frame when I removed the bolt for swinging the backing plate out of the way. I hand tightened them back with a ratchet until I was ready to drop the frame.
15. Disconnect the exhaust attached to subframe. I left the exhaust attached to the engine manifold. It is a little crowed, but the subframe will lay on the exhaust pipe when it is dropped to remove the transmission. The exhaust drops down with when the engine/transmission is lowered on the driver side to pull out the transmission. I tried to loosen the exhaust nuts and was concerned I would break them off. I don’t have a torch anymore so I was not wanting to deal with broken bolts here, if I could get away with leaving it attached. It worked out leaving it attached.
16.Place a tranny jack under the tranny ( I used a regular jack with a piece of 2x4 on it to support the weight better). I also installed a support beam over the engine. It was made of 4x4’s on the sides and 3 - 2x6 bolted together over the engine. I attached strapping to both the engine and transmission from the beam.
17. Remove 4 transmission mounts attached to sub frame. One nut rounded off on mine. Raise the engine slightly to take the weight off the mounts. Remove the mounts. The front engine mount near the radiator, take off the top nut only. The rear engine mount next to the fire wall, unbolt from the mount from the subframe. The two mounts on the transmission, take the nuts off the subframe. The engine mount on the passenger side, near the serpentine belt, stays on. The engine swivels off this. It will cause the pulleys to lay against the side frame when the transmission end is dropped for removal. I raise it back up a little after the transmission was removed to relieve any stress on the pulleys. May also loosen the side mount bolts to get a little extra play in lowering the engine.
18. Loosen the transmission bolts (should be 8). I loosened these as I came across them while disconnection other stuff. I miss counted one, the one that is next to the intermediate shaft. You need a total of 36” of extension rod to get this from the passenger side. I cracked my 3/8” 17mm socket on this. I left this one at the side, intermediate shaft, in place and slowly loosened it as I pulled some on the transmission. The bell housing separated about ¼ inch, so I new I was good on getting detached. Completely removed the bolt and was ready for removal.
19. I placed a piece of ¾ inch plywood at the subframe the slide the transmission to the ground. I left my vehicle close to the ground so I could have good access from above. If I needed, I could raise it to remove the trans. It worked out that I did not raise it, but needed some wiggling. My drive side jack stand was only 13” off the ground. Got a little tight getting in and out. I put carpet down, spent a lot of time down there and not too bad when you want to a break.
Notes. After you spend a lot of time looking at the tranny from above and below, you will start to recheck for connections to the transmission. You should also print some photos of a transmission to start to see what comes out with the transmission.
I made marks on the subframe and the car body to try and align the frame back correctly when it is installed.
In the 4th attachment, you can see the subframe below the trans, and the subframe laying on the exhaust.