Honda Odyssey Forum banner
61 - 80 of 267 Posts
Whether people use the brass spacers from McMaster or the Plastic Rollers from Lowes (BTW, each spacer is 30 cents at hardware store, so you lose basically nothing by getting 4 of these; 2 per sliding door).

There is a way to do this without removing the tail light and trim piece etc.

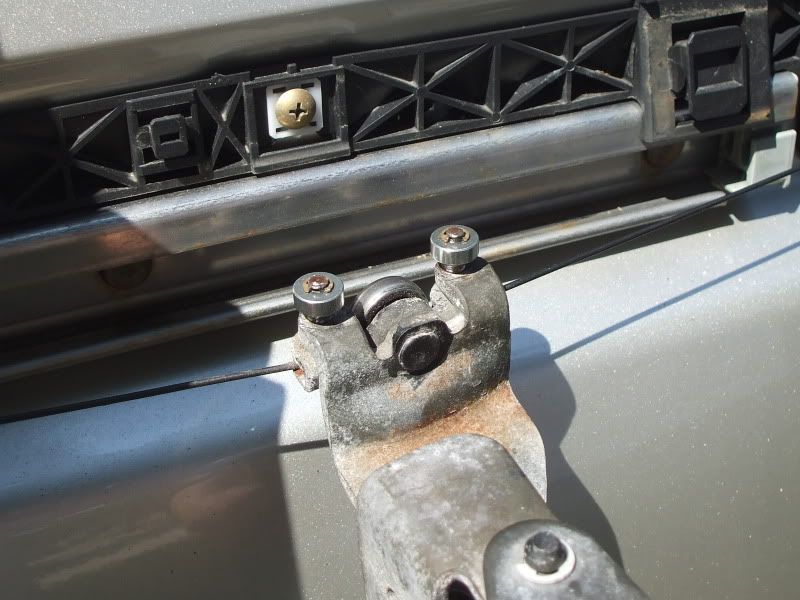
1. Open the sliding door about 2 feet to expose the two (2) 12-mm bolts.
Loosen these bolts but do NOT remove them.

2. Now slide the door toward close but do not close it. Leave it ajar about 2-3 inches.

3. Using a floor jack with a rag to support the bottom of the sliding door, remove these 2 bolts and wiggle the hardware out.

4. Remove E-clips using a pair of pliers.
You can always re-use the E-clips.

5. If the new space is a tad thick, then you can always use sand paper to sand it down a touch.
If you have a measuring caliper, that is better because you can use it to measure the thickness.

You should be able to do each door in 30 min, including beer time LOL.
 
Thanks for the info. Will this work for powered doors as well, or just manual doors?

Whether people use the brass spacers from McMaster or the Plastic Rollers from Lowes (BTW, each spacer is 30 cents at hardware store, so you lose basically nothing by getting 4 of these; 2 per sliding door).

There is a way to do this without removing the tail light and trim piece etc.

1. Open the sliding door about 2 feet to expose the two (2) 12-mm bolts.
Loosen these bolts but do NOT remove them.

2. Now slide the door toward close but do not close it. Leave it ajar about 2-3 inches.

3. Using a floor jack with a rag to support the bottom of the sliding door, remove these 2 bolts and wiggle the hardware out.

4. Remove E-clips using a pair of pliers.
You can always re-use the E-clips.

5. If the new space is a tad thick, then you can always use sand paper to sand it down a touch.
If you have a measuring caliper, that is better because you can use it to measure the thickness.

You should be able to do each door in 30 min, including beer time LOL.
 
2008 LX Right side sliding door roller replacement..

I just replaced the right side roller on my 2008 LX @ 41Kmi yesterday. It started acting crunchy when opening/closing, then shed the nylon cover off the center roller and got REAL noisy.

I removed the rail cover (thankfully discovered on this thread!) and supported the door on an inverted plastic bucket. The hardest part for me was pressing the pin out of the factory assembly so I could install the new roller assembly onto the OEM bracket. Things were corroded a bit thanks to the winters.

I swear I didn't notice any circlips holding the rollers onto the new assy, although they could have been there. I just assumed they were pressed on somehow.

I also noticed a disturbing amount of rust on the inside of the rail cover. Something that likely wouldn't be apparent for years.. but still. :nothappy:

Neither of these two issues (rollers or rust) should be happening this early, but I guess it was cheap and easy enough to repair for now. I didn't pursue a dealer/warranty repair due to a big dent in the right side slider door. I'm sure they say the roller got destroyed by that particular parking lot 'hit' that's been there for 2.5yrs.

FWIW, I got the new OEM roller assy from eBay. $30 shipped.

Oh.. It did take some fiddling to get the door set back to it's original alignment. The first time it rubbed badly, the second attempt, it closed funny. I just had to loosen the two roller bracket bolts and reposition the door a few times until I got it.
 
I replaced the rollers on my wife's 2005 Odyssey this weekend. I used brass spacers which are zinc platted that measured ID=.192" OD=1/2" H=3/16". The part number for the spacers is 90309A331. Here is the link -- McMaster-Carr.

The OEM rollers where still intact when I removed the roller assembly, but the rollers were showing some wear. The inside diameter of the roller was enlarged which made the roller not roll smoothly. I did have to use a Dremel with a cut off wheel to cut the rollers in half to remove them. I also used the Dremel to removed the cut the metal ring which held the roller on.

After I removed the roller, I applied grease to the roller post and installed the brass roller and then secured it with a 5/32" e-clip (see picture below). I also cleaned the bottom track and re-greased it. The door opened and closed much easier and quieter after the installation.

Image
 
Great to hear, thanks for the info!

I replaced the rollers on my wife's 2005 Odyssey this weekend. I used brass spacers which are zinc platted that measured ID=.192" OD=1/2" H=3/16". The part number for the spacers is 90309A331. Here is the link -- McMaster-Carr.

The OEM rollers where still intact when I removed the roller assembly, but the rollers were showing some wear. The inside diameter of the roller was enlarged which made the roller not roll smoothly. I did have to use a Dremel with a cut off wheel to cut the rollers in half to remove them. I also used the Dremel to removed the cut the metal ring which held the roller on.

After I removed the roller, I applied grease to the roller post and installed the brass roller and then secured it with a 5/32" e-clip (see picture below). I also cleaned the bottom track and re-greased it. The door opened and closed much easier and quieter after the installation.

Image
 
I asked to have the two electric side doors greased during my A1 service this last week on my 07 Touring as the passenger side door had a slight squeak. When I picked the van up from service the dealership said that I should consider getting the center ridge roller bearings replaced if it starts to squeak again.
Quoted price for both doors was $149.62 for parts and $315 for labour.
 
Hi guys,

Anyone thought about replacing the plastic or nylon wheels with proper sealed roller bearings? I'm sure I could find some that was the right size somewhere, possibly a hobby shop?

While I like BSQ's idea of a more permanent solution by using the brass spacers, I'm thinking that "something" still has to wear and by putting the brass in there, perhaps the rail will then wear more. I think its MUCH easier to replace the wheels, even several times throughout the life of the van if necessary than the whole rail. However bearings may be a more permanent solution and the wear may be contained to within the bearings themselves which are designed for a LOT more life than the use it would see in the life of the van.

Any thoughts from you all?

Cheers...
D
I'm not sure if there are roller bearings the size of the rollers. I did a search online and I was unable to locate a bearing of this size.

On the question of wear. The rail is made from stainless steel, so the brass roller would be the softer of the two materials. I did lubricate the shaft that the brass roller is mounted to with bearing grease, so there should be little to no wear of the inside bore of the roller.

I would estimate that the brass rollers will have a longer service life than the plastic rollers that it came equiped with.
Yea, I found a couple sealed bearings that would fit, NTN has a couple different ones that would work, a little shorter than the plastic but that's not a critical dimension in this application.

I get your point about brass being softer than the stainless rail, I suppose that's a fair arguement but the pin/shaft is still a concern. Yes grease will help but not eliminate the wear and here in Canada or anywhere where snow/ice and cold gets in that area will surely displace the grease in time.

Don't get me wrong, I think the brass is a great idea and will definately last longer than the plastic rollers. I just wonder if the brass will last longer than the service life of the entire van or if you may be replacing that bracket sooner if the pins wear out and break off.

Also, just out of curiosity... have you compared the brass with a "new" plastic one with respect to noise? Metal on metal tends to produce a "grinding" sound, do you get that at all?

Cheers...
D
 
By the way, for those interested NTN has their catalog online and I found 2 of their bearings that appear to fit, part numbers RA3ZZ and/or WBC5-13ZZ. No idea where to purchase them, and likely other bearing manufacturers have some too that would fit.

I'm still undecided on how I'm going to repair mine, looks like these are the options:
- replace bracket with new Honda bracket with new wheels
- retain existing bracket and replace wheels with nylon spacers from Lowes
- retain existing bracket and replace wheels with brass spacers like BSQ did
- retain existing bracket and replace wheels with sealed roller bearings

:huh:
 
Also, just out of curiosity... have you compared the brass with a "new" plastic one with respect to noise? Metal on metal tends to produce a "grinding" sound, do you get that at all?
The brass rollers are actually very quiet. Their are quieter than the worn plastic rollers. I would estimate that the doors are as quiet as when the van was new.
 
By the way, for those interested NTN has their catalog online and I found 2 of their bearings that appear to fit, part numbers RA3ZZ and/or WBC5-13ZZ. No idea where to purchase them, and likely other bearing manufacturers have some too that would fit.

I'm still undecided on how I'm going to repair mine, looks like these are the options:
- replace bracket with new Honda bracket with new wheels
- retain existing bracket and replace wheels with nylon spacers from Lowes
- retain existing bracket and replace wheels with brass spacers like BSQ did
- retain existing bracket and replace wheels with sealed roller bearings
Go with the road less traveled and let us know how it works. You'll have web forum immortality.
 
By the way, for those interested NTN has their catalog online and I found 2 of their bearings that appear to fit, part numbers RA3ZZ and/or WBC5-13ZZ. No idea where to purchase them, and likely other bearing manufacturers have some too that would fit.

I'm still undecided on how I'm going to repair mine, looks like these are the options:
- replace bracket with new Honda bracket with new wheels
- retain existing bracket and replace wheels with nylon spacers from Lowes
- retain existing bracket and replace wheels with brass spacers like BSQ did
- retain existing bracket and replace wheels with sealed roller bearings
Well,

The whole idea about this thread is to replace the "roller" with inexpensive Lowes plastic roller vs McMaster-Carr brass roller.

If you have come to the point where the bearing is bad, then you may as well replace the whole assembly. The whole assembly is not that expensive and it is way less headache than sourcing every little parts in that assembly.

72561-SHJ-A21 is $35 in the USA.

PS: You live in Canada so the price is higher.
Yes, that part is close to $100 up here in Canada and if you need two, well that's $200, and again just for the part. Stupid rip-off dealer parts counters up here! :nothappy:

BTW, I'm still talking about the 2 rollers and replacing THEM with a bearing, not the lower bearing wheel, that is fine and not what we're talking about.

For me, this is not just about $, but solving a problem the right way. Discussion can be had about OEM being the "right" way, however clearly the OEM part with the plastic rollers does not last more than a few years, certainly not going to last the life of the van.

Plastic rollers/spacers from Lowes is the lowest cost option, but essentially gives you the same solution as the OEM part.

So far, BSQ's idea of the brass roller is the only one that will outlast the OEM design, my comments above are just around at what expense. Rollers will definately last longer, rail will likely not wear any faster (maybe a little), will there be more noise in say 6 months of use? Will the pin holding the brass roller wear out when the grease is displaced in weeks/months/years? etc....

As for the bearing idea... to me this seems to be the longest lasting with lowest consequences, however may be expensive to purchase. I think those bearings can be close to $8 each, need 2 per bracket + S&H.

For me, I've ordered new OEM brackets from a dealer in USA, 2 brackets and shipping to Canada is like $80. When I get them and change them, I may see about putting bearings on the old brackets for the next replacement job, which at this rate will be in 2-3 years from now.

Cheers...
D
 
...BTW, I'm still talking about the 2 rollers and replacing THEM with a bearing, not the lower bearing wheel, that is fine and not what we're talking about...
dcaranci,

Sorry I misread your post. You are right re 2 rollers (not the bigger bearing), options are:

1. Plastic roller, cheap at Lowes. Plus it is easy job so if you have to do this every 3-4 years, it is not so bad.

2. McMaster-Carr Brass Rollers. This is probably the best. Regardless, spray some silicone lube twice a year etc.

3. Bearings as you said. The problem is: when it is such a small part, they use roller instead of bearings!

So, for the most part, I think #2 is the best solution.

PS: I think LX model has less of an issue because you pull the sliding door manually. The EX uses a motor to drag on the assembly, placing a lot of force on the rollers, causing wear much faster.
When I sold my 2001 Ody LX in 2007, at 6 years/80K miles, the plastic rollers were still good.
 
PS: I think LX model has less of an issue because you pull the sliding door manually. The EX uses a motor to drag on the assembly, placing a lot of force on the rollers, causing wear much faster.
When I sold my 2001 Ody LX in 2007, at 6 years/80K miles, the plastic rollers were still good.
Just to add to your theory, I believe the added weight of the power window mechanism also adds to the pre-mature wear of the OEM bushings as well. Just my2c
 
Well I'm trying the brass rollers now as my plastic replacement (ACE version) seems to have disintegrated since my repair which was a year or 2 ago.
 
I have searched but cannot find. Does anyone know where I can find a tutorial or video on how to remove the sliding door panel the whole inside to get to the actuator?
 
I have searched but cannot find. Does anyone know where I can find a tutorial or video on how to remove the sliding door panel the whole inside to get to the actuator?
This is a related post (2005 Ody Right Side sliding door latch), but it does not tell you exactly how to remove the Sliding Door Panel:

http://www.odyclub.com/forums/52-2005-2010-odyssey/54192-2005-ody-ls-sliding-door-latch.html


I just checked my Technical Manual, here it is:

1. Open the sliding door a bit.

2. Lower the Glass fully.

3. Remove power window switch by:
- prying on the REAR edge of the switch with a trim tool (of flat screw driver wrapped in cloth).
- the switch is held by hooks & a fastener (clip) at the REAR, it will pop out with the pry tool.
- d/c electrical connection.


4. The Inner Door Handle is held by a C-clip. So use a wire hook to remove it (or a tool to spread the tips apart so it can be removed).
Then remove the Inner Door Handle.

5. The Door Panel is held by approx. 11 clips.
Pry it out using a Trim Tool (or flat screwdriver wrapped in cloth).

6. If you have sunshade, then remove the screws on the sunshade.


PS: You may need some clips from dealer before re-installing the Panel.
It is about $1.50 each.
Napa also carries some generic clips that may fit.
So get a few of these clips beforehand.

* Please take some pics and post them for future reference as others will likely need them!
 
I replaced my left side roller last night. Very easy to do. Only issue I had was the screw to remove the side panel. Ended up using the needle nose to pull it out.

Door kind of clicks loud when I open it, but it locks and seals and opens without issue. Anyone have any ideas on why it makes a loud POP sound? The bracket is mounted in the same position as it was when I took it off.
 
61 - 80 of 267 Posts