Honda Odyssey Forum banner

Throttle body cleaning: a step by step guide

2 reading
23K views 39 replies 16 participants last post by  Slowsh  
#1 ·
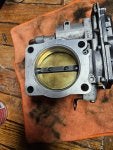
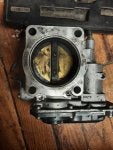
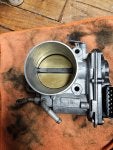
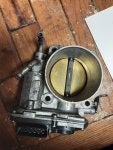
The usual complaints led me to take the time to clean the throttle body: hesitation on start, sluggish throttle, etc.

I decided to create a simplified step-by-step guide for someone with limited automotive skills to have the confidence to tackle this job.


Start this project by removing the shroud above the front bumper. Lift up on the edge closest to the engine. It is held in place by about a dozen clips, so slowly work your way around the cover.
Image


And, this is what you end up with:
Image


The next step is to remove the snorkel from the grill to the air filter box, (right side in picture above). Unscrew the center of the two fasteners using a Phillip's screwdriver, and pry out the remaining fastener with a flat head screwdriver.

Image


Image


This is what you end up with, which should be familiar if you have replaced the battery:
Image


Unplug the mass flow sensor and release the wiring harness from the air intake.
Image


The hose clamp in the picture above needs to be loosened. Based on experience, the Phillips head will easily strip out. I'd suggest using a socket instead. The size is 5.5 mm, which isn't usually found in most metric sets. However, a STD 7/32" socket will work, but it must be six point. Make sure the hose clamp is really loose, and remove the housing for the top of the air filter.

This is where we are now at:
Image


Now would be a good time to pop off the engine cover:
Image


To be continued...
 
#2 · (Edited)
The pipe connected to the intake needs to be removed (hose clamp at the right side of the picture). The spring tension is low, so squeeze with your fingers and slide the clamp up.
Image


Slide the tube off the air intake and set the clamp aside so it doesn't get lost.
The is part of the air intake, so there is no fluid to worry about.
Image


Next step, unplug the wiring harness shown below. Using a needle nose pliers, squeeze the tabs on the zip tie clip to release the harness from the bracket. Finally, release the harness from the clip in the side of the air intake.
Image


Once again, loosen the clamp and remove the air intake from the throttle body.
And here's what it will look like:
Image


There is a wire harness connected to the throttle body. I would highly recommend against pulling on the wires. Instead, squeeze the tab with one hand, and use a flat screwdriver to gently pry the the harness from the throttle body.
Image


Almost at the home stretch, but there a few items left. There are two coolant hoses connected to the throttle body. Do not proceed unless the engine is completely cold.
Image


To be continued...
 
#3 · (Edited)
Using a needle nose pliers, slide the two clamps and inch or two up the hose.
The hoses tend to "weld" themselves to the barb. I usually use a flat-bladed screwdriver to pry the hose off, Carefully work your way around the hose until it pops free. Try not to stab yourself when you are doing this.

You will lose about 1-2 tablespoons of coolant when the hoses are removed. However the coolant will NOT continue to flow, so no need to clamp the hoses, or try to plug them.

Image


At this point, the throttle body can be removed by unscrewing the four 12 mm bolts.
 
#4 · (Edited)
Unfortunately, I do not have any pictures of the dirty throttle body. Hopefully someone can add a few pictures

Rubbing alcohol seemed to work best for cleaning the soot and varnish. I used a clean rag and q-tips to remove the carbon.

The butterfly valve is spring loaded, so it can be held open to make cleaning easier. Don't forget to clean the edges of the throttle body.

Once the throttle body was clean, I placed a few drops of light oil on the pivot points, and this seemed to really free up the butterfly valve.

Most auto parts store sell the complete throttle body for around $150, so this is also an option.
 
#9 ·
Once the throttle body was clean, I placed a few drops of light oil on the pivot points, and this seemed to really free up the butterfly valve.
Thanks for your write up. It will come in handy if I ever need to do it.

Regarding the oil on the pivot points, what I've found is that "Super Lube" products are unbelievably good. For example, all of my adult life, household fan motors start binding up after months or a year of use. I've had to constantly disassemble the fans to clean and lubricate the motor shafts with grease when the motors slowed down.

Then I discovered "Super Lube" synthetic grease. This grease is so good that after greasing the fan motor shafts just one time, they never bind up again after years of use. When the fans are turned off, they just keep spinning until their momentum dies off. Unbelieveably good synthetic grease.

There is also a Super Lube synthetic oil which could be used to lube the butterfly valve shaft.
 
#10 · (Edited)
There are many complaints about hesitation and poor throttle response. This could be potentially fixed for $0.00 and about two hours of time with basic tools. No need to jack up the vehicle, remove tires, etc.

I'm really hoping someone could add some pictures of their throttle body before/after.

I forgot to take pictures.
 
#15 ·
Looking good, thanks for adding the missing pictures.

Did you put a few drops of oil on the pivot points? Any noticeable difference afterwards?
I got to drive it a lot today and the cleaning has gotten rid of the hesitation which I’m happy about. I didn’t put any oil on the pivot points. I may have to do that and see if it makes any difference in the throttle response. But yes overall this helps with the hesitation and throttle response.
 
#16 ·
hello i was taught to never spray anything directly around or into a throttle plate because some have coatings on the plate and shaft that can be washed away with carb cleaner etc. best to just access front of assembly, get throttle plate open and use a rag that is wet with carb cleaner and use your finger. ive used a non scratching stick wrapped with a rag to get inside a little easier on some vehicles. it doesnt have to be spotless, just get the buildup off. its important to not scratch anything while attempting this too. i cant tell by pics if theres any bushings on the shaft but if there is they are prob oil impregnated and dont need lube anyways. any oil, grease, or whatever you put there is going straight into the intake anyways. these shafts are always moving and do wear out at some point, then you can only replace.
 
#21 ·
Use these tools for removing and clamping your coolant hoses.

These picks work great for breaking the rubber hose loose around the tube the hose is slid on The longer ones help for reaching the bottom heater hoses, be sure to work them all the way around the hoses. Beats trying to use a screw driver as they normally rip the rubber hoses.
Image


10" Radiator Hose Clamping Pinch Off Locking Pliers Clamps up to 2" hose OD.

Image
 
#22 ·
TB cleaning accomplished! The instructions were great! The wiring harness attached to the TB was the most fussy, for me. I unearthed a cracked air intake tube...aftermarket is not available yet, and Used would've taken a few more days, so I bit the $90 dealer cost. I'm happy with how clean it got. Also replaced the air filter while in there.

*My big question now is how to get rid of the 10 new trouble Codes that are now firing? I assume with two harnesses being removed/reattached, that some sort of system reset needs to occur. What should I do?

Thank you!
 

Attachments

#23 ·
A simple disconnect and re-connect of the harnesses should NOT trigger 10 codes. Double check the harnesses and make sure they are properly clicked and locked in place. An improperly connected harness would cause the codes.

After ensuring that the connectors are firmly snapped in place, time for a scan of the codes and perhaps a reset to see if they return.
 
  • Like
Reactions: 0dyfamily
#26 ·
Thanks for posting this. I have an 18 and have been cleaning mine every oil change for the past few years. But even after fresh cleaning it still doesn’t drive great, it’s just better than dirty.

Curious, has anyone tried replacing it all together? Wondering if the one I have is defective. Mine has an indent toward the bottom of the plate - I noticed when pushing the plate back to clean.
 
#27 ·
@Aclement1618
Price around $175, have not had a reason as of yet to need to clean it, almost at 60K miles. If it does have a indent on the plate or the body I would say that is not normal. But if it is idling correctly, don't bother.
 
#28 · (Edited)
@DJVAN makes sense - i wish I didn't have a reason to clean it I'm at 72k miles (9-speed problems...). I've just had poor shifting for ~50k miles and tried the following solutions to no avail: cleaned TB every 5k, trans flush, and TSBs. Only thing that somewhat helps is the TB cleaning. Ordered the part but scheduled an appt with dealer to inspect and request warranty replacement first.