

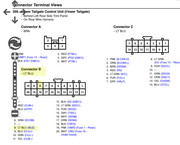
Hi all, i just completed this mod tonight and it took me around 45 mins. I cant stand the annoying beep the power tailgate makes especially when i get home late and need to unload stuff and don't want to wake the whole neighborhood. i read some posts by others that they were able to muffle the sound. I decided to add a 12V rocker switch in-line with the wire that feeds power to that lovely beeper. this way i have the option of switching it back on if i miss listening to it. One can also just cut/terminate the wire to be rid of it. The beeper itself sits below the left tail light assembly behind the bumper. i looked up the the wiring schematic for my Canadian 2011 Touring, the wire that powers the beeper is light blue and it is pin#8 at the 20-pin connector behind the left rear panel(inside cargo area), the panel with 12V power outlet and cubbies. The 20-pin connector is also light blue. i'll upload some pics soon. As with any mods, Do at your own risk. I am not responsible for any mistakes or unfortunate results such as that the beeper starts to swear at you in a Samuel L. Jackson voice.
http://techinfo.honda.com/rjanisis/...jxa_isisviewer_sa.aspx?content=svg.svg&k=K81113/enu/K81113201220A_0001&p=EM&t=V
Tools
18 gauge wire. i used about 2 feet+. the more the better. splice at stock wire, to the panel and back and it's nice to have slack when adding the switch.
12V rocker switch
2 female spade connectors for the rocker switch
torch or solder gun
Solder and heat shrink(not required if using bullets but i prefer to solder)
lighter for the heatshrink
wire cutters
pliers to remove the plastic knobs placed for the cargo netting. add masking tape to it so it doesn't mar anything
makeshift template of the switch. i used paper
drill and router for creating a hole for the switch
1) Open rear tailgate and absorb that annoying tone......then exhale a sigh of relief knowing that you will be rid of it soon. make sure the magic seats are up so you have access to the panel at the lower back where it latches to the tailgate. This needs to be removed first as it is sitting on the other panel you need to get at. its held in by 2 cargo netting knobs. use a plier to loosen it like a screw. just enough so you can use your fingers the rest of the way. then just rank it out.
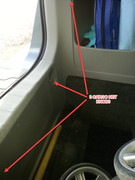
2) Loosen/remove the left upper cargo netting knob that is above the shelves. loosen enough weather stripping to remove the panel. Pull towards to loosen the panel but not too hard as the 12V power outlet has a connector. disconnect the 12V outlet. the entire panel does not need to come off. its flexible enough to bend and do work. i bent it just past the speaker. it was enough to get to the 20-pin connector.
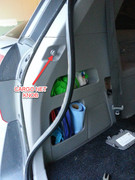
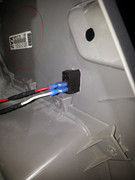
3) Disconnect the light blue 20-pin connector. there is 2 light blue connectors. it is the top larger one. Find and expose the light blue wire at pin#8, cut the wire a distance away so you have room to splice into it. If one doesn't care to go further, then just tape up the ends and plug the connector back in and reassemble in reverse. No more beep forever. if not, continue....
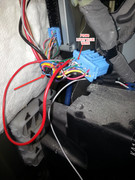
4) measure wire, strip and Solder your wires at each of the stripped ends of the light blue wire, then heat shrink.
5) at the other ends of the new wires strip/add a female spade connector that matches the male spades of the 12V rocker switch. connect them to the switch and plug the 20-pin connector back in. Test! should work.
6) Next is to mount the switch, i removed the connections at the switch for now as the switch needs to be fed into the panel from the front. i traced an outline of the switch on a small piece of paper. i cut out the inside so it left a hole. i taped the template on the panel right above the inserted shelves. check the inside of the panel that it's clear. i then i used a small drill bit and made many holes along the outline. after that i used my route with a metal wheel to remove the unwanted plastic. The switch didn't fit at first as it was still too small so i swapped to a rounder bit. after shaving off more it finally fit. reconnect the wires and test again.
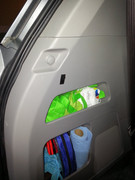
7) Reconnect the 12 volt power outlet and start reassembling everything in reverse. make sure to reattach the weather stripping and the 3 cargo netting knobs.
Hope this helps.
http://techinfo.honda.com/rjanisis/...jxa_isisviewer_sa.aspx?content=svg.svg&k=K81113/enu/K81113201220A_0001&p=EM&t=V
Tools
18 gauge wire. i used about 2 feet+. the more the better. splice at stock wire, to the panel and back and it's nice to have slack when adding the switch.
12V rocker switch
2 female spade connectors for the rocker switch
torch or solder gun
Solder and heat shrink(not required if using bullets but i prefer to solder)
lighter for the heatshrink
wire cutters
pliers to remove the plastic knobs placed for the cargo netting. add masking tape to it so it doesn't mar anything
makeshift template of the switch. i used paper
drill and router for creating a hole for the switch
1) Open rear tailgate and absorb that annoying tone......then exhale a sigh of relief knowing that you will be rid of it soon. make sure the magic seats are up so you have access to the panel at the lower back where it latches to the tailgate. This needs to be removed first as it is sitting on the other panel you need to get at. its held in by 2 cargo netting knobs. use a plier to loosen it like a screw. just enough so you can use your fingers the rest of the way. then just rank it out.
2) Loosen/remove the left upper cargo netting knob that is above the shelves. loosen enough weather stripping to remove the panel. Pull towards to loosen the panel but not too hard as the 12V power outlet has a connector. disconnect the 12V outlet. the entire panel does not need to come off. its flexible enough to bend and do work. i bent it just past the speaker. it was enough to get to the 20-pin connector.
3) Disconnect the light blue 20-pin connector. there is 2 light blue connectors. it is the top larger one. Find and expose the light blue wire at pin#8, cut the wire a distance away so you have room to splice into it. If one doesn't care to go further, then just tape up the ends and plug the connector back in and reassemble in reverse. No more beep forever. if not, continue....
4) measure wire, strip and Solder your wires at each of the stripped ends of the light blue wire, then heat shrink.
5) at the other ends of the new wires strip/add a female spade connector that matches the male spades of the 12V rocker switch. connect them to the switch and plug the 20-pin connector back in. Test! should work.
6) Next is to mount the switch, i removed the connections at the switch for now as the switch needs to be fed into the panel from the front. i traced an outline of the switch on a small piece of paper. i cut out the inside so it left a hole. i taped the template on the panel right above the inserted shelves. check the inside of the panel that it's clear. i then i used a small drill bit and made many holes along the outline. after that i used my route with a metal wheel to remove the unwanted plastic. The switch didn't fit at first as it was still too small so i swapped to a rounder bit. after shaving off more it finally fit. reconnect the wires and test again.
7) Reconnect the 12 volt power outlet and start reassembling everything in reverse. make sure to reattach the weather stripping and the 3 cargo netting knobs.
Hope this helps.
![IMG_4185[1].JPG](/d1/attachments/33/33225-231b3f4f7c463654abf6da0abaaf07b0.jpg)
![IMG_4187[1].JPG](/d1/attachments/33/33226-ead32b45906c0ce6d939bb0f2dbc0771.jpg)
![IMG_4183[1].JPG](/d1/attachments/33/33227-36fab0dd7e333a23c7760f6b22483e88.jpg)
![IMG_4181[1].JPG](/d1/attachments/33/33228-942acb5310be153b7bc1cd1e64d43a98.jpg)
![IMG_4179[1].JPG](/d1/attachments/33/33229-1cbcfd171eb90519fa73d1af05bf7a8e.jpg)
![IMG_4184[1].JPG](/d1/attachments/33/33230-9939ef03c4db5623db5b57028f521cd8.jpg)


